

There are several parts of a sword. The blade is the most visible and extends through the pommel and handle. It also includes a narrower part called the tang. The hilt sits on the shoulder of the blade. A sword’s blade can be made of several different materials and can come in various colors.
Blade
The parts of the sword include the blade, tang, grip, and pommel. These components are integral to the stability of the sword and distribute weight evenly. A sword with a full tang is more rigid and stable than one with a partial tang. The pommel can be riveted to the tang, a safer and easier method, or bolted.
Historically, sword making has been done by carving each part of the blade. This process has been practiced since ancient times, although it was only in the 19th century that the process became more widespread. While the process is labor-intensive, it can preserve the aesthetics of a sword.
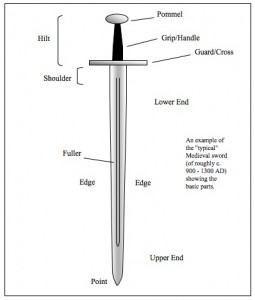
Pommel
The pommel of a sword is the uppermost part of the hilt. It is made of a copper alloy and semi-hollow castings. The upper guard is shaped like a concavo-convex cylinder with a raised ridge line. It measures approximately 74.0 mm long and 8.7 mm wide. The bottom part of the pommel is composed of a formed piece of silver. Both parts are soldered together.
A sword’s pommel should be the right size and weight for the user. This makes it more comfortable to hold and balance. However, it should be noted that pommel weight varies depending on the type of weapon.
Cross-guard
A cross-guard is a part of a sword’s handle that is usually made of wood or plastic. It serves as a counterweight to the blade and brings the Center of Balance closer to the cross-guard. This helps make the sword easier to hold and wield. It also provides a blunt surface that can be used for striking.
In the fourteenth and fifteenth centuries, the cross-guard began to take more elaborate forms. This was evident with the introduction of the cusp, a protrusion of the cross-guard that is fitted to the blade. In addition, the leather chappe was sometimes replaced with a sheet of metal. For example, a sword from the 1320s-40s at the Kelvingrove Museum in Glasgow has a metal rain-guard decorated with a floral motif.
Fuller
The fuller of a sword is a shallow central groove that improves the strength and flex of the blade. Although this feature is usually present, it does not affect blood flow, cutting power, or the blade sticking to the target. A sword may have one fuller or several running lengthwise. A shallow fuller is called a fluke, and a narrow, deep fuller is known as a riser. A fuller increases rigidity and reduces weight.
The fuller of the sword is a feature of a samurai sword. The fuller terminates several inches before the sword’s natural tip. This feature adds to the overall beauty of the sword.
Central ridge
The shape of a sword blade is crucial to its potential as a weapon. This is achieved through its blade geometry, also known as the Center of Balance, Point of Balance, or CG. To determine if a sword blade has CG or POC, place a ruler on its edge, then move the blade from the hilt to the point. Once you reach the point, measure its central ridge and note its thickness.
The central ridge of the sword is the area of the blade that is thickest. The ridge line is called shinogi-ji on the side away from the edge, and hira-ji on the side facing the guard. The width of the shinogi-ji varies depending on the school and generation. The shinogi-ji of a sword can be very wide or extremely narrow. During the early Heian period, blades often had a wide central ridge. The ridge line was usually thicker than the rest of the blade and was used as a guide when determining a sword’s shinogi-ji.
Menuki
The menuki, or hilt decoration, is an important part of a Japanese sword. Historically, it served as a grip for the mekugi (sword tips). The menuki evolved over time to become a decorative feature. It is attached beneath the Tsukamaki, a threaded handle.
The menuki is not always used. Sometimes, it is obscured by the ito wrap. The ito handle wrap should be tightly wrapped to keep the menuki from shifting. But, if the wrap is too loose, the menuki can easily shift. To prevent this, a toothpick with some gorilla glue can be used to firmly set the menuki in place.


