

The first step in installing a door latch is to determine where the hinges will be. To find the correct placement, hold the door closed and extend a pencil horizontally up the middle rail of the door. This will give you the vertical position to drill the strike plate hole. The bottom and top position of the door hinges will also determine where to position the latch plate.
Square corner faceplate latches
When installing a square corner faceplate latch, you’ll need to drill a hole that is the same size as the rounded corner faceplate. Once the faceplate is installed, you’ll need to prepare the door to accommodate the new latch. Most door shops use a router jig to prep the door for the latch. If you’re doing it yourself, you’ll need to drill a one-inch-deep hole and use a 1″ chisel to prepare the door for this type of lock.
You can also use a countersink bit to countersink the hole. This will remove any excess material, leaving you with a square corner faceplate. Next, you can install the lock hardware. Make sure that the door latch is square, too.
Depending on the type of faceplate latch, you may have to drill a hole 60mm or 70mm from the edge of the door. Make sure you measure the width of the door, as the lock lever will strike it and penetrate it. If your door is square, you can use a 25mm holesaw for this purpose.
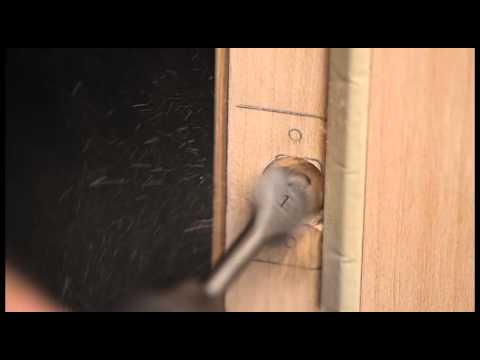
Drive-in latches
If you plan to install a new drive-in door latch, you need to know what size hole you need to drill. This will help you ensure that your latch will fit correctly. To determine the correct size hole, you need to first determine where your door hinges are. To do this, hold the door closed and trace a horizontal line down the middle rail of the door, then move the pencil to the door frame. This line will indicate the position of the latch plate, and therefore what size hole you will need to drill.
You can also use a template to determine what size hole you need to drill for a drive-in latch. This template should fit flush to the edge of the door. Before drilling, you should place the template against the flat of the latchbolt or deadlatch. Once you have located the centerline, you need to bore a hole that is a minimum of 1 inch deep into the jamb.
Rounded corner faceplate latches
If you are installing rounded corner faceplate latches on your door, you should know what size hole you need to drill. Most prefabricated doors are pre-mortised for these latches. However, if you have a square door, then you will need to drill a smaller hole for the latch.
The first step is to measure the width of the door. Typically, you’ll need to drill the hole 60mm to 70mm wide. This hole is the center point of the lock set. You should mark this with a pencil. Once you’ve marked the hole, you can use a 54mm holesaw to drill the main hole. Make sure to hold the holesaw level and adjacent to the door.
Besides drilling a hole of the right size, you should also consider the backset of the lock. This is important to avoid tearing out any wood. A hole of 7/8″ to 1″ in diameter will fit the latch assembly. The latch faceplate, which is made of metal, has square or rounded corners and is about 1/16″ thick. Often, the wood around the edge of the door needs to be removed to make the faceplate flush with the edge. The process of mortising the faceplate is also known as mortising.
Drive-in latches with ribbed collars
If you are considering installing a drive-in latch, it is important to know how to properly size the hole. The door prep should include a hole of at least 1″ diameter on the edge of the door. Once the door has been prepped, slide the latch into the cross bore and tap it into place with a mallet. This type of latch has a ribbed collar that wraps around the top of the latch.
Drive-in latches are often fitted with door knobs. In order to properly fit them, the hole in the door must be large enough to accommodate the length of the doorknob and the latch. A 10mm drill bit should be sufficient to drill the hole.


